

As I mentioned in my previous post, we have many types of desktop pool in Horizon View, today we will discuss about How to create an Automated Dedicated Pool with Full Clone Technology. Normally Full Clone desktop pools are used for dedicated user assignment, which mostly needed for Day to Day operations for developers.
Configurations on VMware vCenter
Creating the Virtual Machine
Once you have logged in to VMware vCenter Server, click Hosts and Clusters, Right click on on the Cluster & create a new virtual machine. Follow the steps & complete the process.

Converting the Virtual Machine to Template
Power off the created VM (WIN10-FullClone-Base). Right-click the virtual machine, and then point to "Template."
Click "Convert to Template", Select the Yes in the Confirmation Wizard.

Once you click on the OK on the Confirmation wizard, the VM is converted to Template.

Creating the Customization Profile
Open vSphere web client and navigate to Policies and Profiles option from menu,
Select VM Customization and Specification > Click on +New.

Name and target OS
Name: Windows 10-FC-VDI
Description: Custom Spec for W10 Full Clone VDI
vCenter: santoshlab-vc.local
Target OS: Windows
Select Generate a new security identity (SID)
Click Next.
Registration information
Owner name : SantoshTech
Owner organization : SantoshTech Inc,
Computer name
Use the virtual machine name
Administrator password
Provide the Admin Password
*Number of times to logon automatically - 1
Note: Select this option, if VDI computer account needs to be placed on a specific OU
Time zone
Specify a time zone for the virtual machine.
Commands to run once
*Enter the commands to run the first time a user logs on.
Note: Custom Domain join Script to place the computer on a specific OU
Network
Specify the network settings for the virtual machine.- use default
Workgroup or domain
Option 1: Add VDI computers accounts to specific OU using a custom script
Select - WORKGROUP and ensure a custom domain join script is created.
Domain Join Script ( Code can be downloaded from the GitHub )

Option 2 :
Select - DOMAIN and provide domain account user details.
Ready to complete

Configurations on Horizon Admin Console
Create Full Clone Dedicated Desktop Pool
Login to Horizon View Administrator console, Under Inventory > Desktops > select Desktop Pools.
From Desktop Pools tab, click on Add.. button

Type
Automated Desktop pool
Manual desktop pool
RDS desktop pool

vCenter Server
In vCenter Server tab, we have three types of cloning option
Instant Clone
View Composer Linked Clone
Full Clone Machine
Select Full Clone Machine, click on Next

User Assignment
Floating
Dedicated
Enable automatic assignment
Users receive the same machines each time they log into the desktop pool.

Storage Optimization
Use VMware Virtual SAN
Do not use VMware Virtual SAN
Select Use VMware Virtual SAN
Desktop Pool Identification
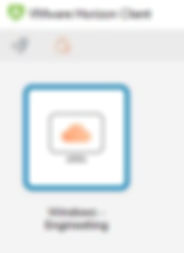
ID - VMC-FCD-ENG (Desktop Pool ID is the unique )
Display Name - Windows - Engineering ( Display Nam user will see )
Description: Full Clone Dedicated Pool

Provisioning Settings
Virtual Machine Naming
Specify Names Manually
Use a naming pattern - Provide the Standard naming format
Provision Machines
Machines on demand
Desktop Pool Sizing
Max number of machines: Provide the number as per your requirement

vCenter Settings
Virtual Machine Template : Source as vCenter
Template - As we created earlier ( WIN10-FullClone-Base)
Virtual Machine Location
VM Folder Location: - Point to the default Datacenter or based o your Choice
Resource Settings
Host or cluster: Select based on the choice
Resource pool: - Select default if its not created anything
Datastores: Select based on the choice

Desktop Pool Settings
State: Enable
Connection Server restrictions: No
Category Folder: No
Session Types: Desktop
Remote Machine Power Policy: No
Automatically logoff after disconnect:
After - 1440 mins ( Based on your requirement )
Allow users to restart/reset their machines: Yes

Remote Display Protocol
Default display protocol: VMware Blast
Allow users to choose protocol: - Yes
3D Renderer: Disabled
Max number of monitors: - 2 ( Based on the Choice )
Max resolution of any one monitor: 1920×1200
HTML Access: Yes

Advanced Storage Options
Default
Guest Customization
Use this customization specification:
Select the "WIndows 10-FC-VDI" - Next

Ready to Complete
All the details will be visible in the final page

Wait for 15-20 mins to get the pool deployed successfully.
Validation
Login to Horizon View Administrator console, Under Inventory > Desktops > select Desktop Pools.
Double click on the newly created pool "Windows - Engineering ", click on the Entitlements tabs, "Add Entitlements", add the required user / security group.

Click on the Machines tab, check if the newly deployed pools have the required machines in "Available" state.
The assigned user should be able to see entitled VDI
Source Code from GitHub